ContentsAbout this Chapter User Login Security Creating and Editing Menus |
Once you have created a WIZARD User account, you are ready to begin creating WIZARD routines. WIZARD routines can be menus, screens, reports, demonstrations, or tutorials.
This chapter explains how to set up menus. You need not begin by creating menus, but it can be helpful in working out how you are going to lay out your system.
WIZARD menus also allow you to include your own programs, procs, reports, or commands.
Chapter 9 and chapter 11 should also be referred to for more information on setting up your accounts.
To access the menus, WIZARD needs to determine the user's identity so that it can direct him/her to the appropriate menus within the account.
On the other hand, you may not want to distinguish between the various users of an account. You need to tell WIZARD which way you want to handle users as they log into the account.
This is accomplished with the Logon Security screen. It is found under the Account Security menu in a new WIZARD account.
The Logon Security screen is the basic security control screen for all users of the WIZARD account. There are two possible ways to set the security for any WIZARD account. These are:
Note that on systems where users usually log into the system with a user name and then an account name, WIZARD will not require them to re-enter their user name as they enter the account, as long as a WIZARD login ID has been set up for their user name.
The second option has advantages in that different people can use the same account but be restricted to only certain menus and each can have different security levels. The first is preferable if you do not want to discriminate between different users or if the account is already used by only one user or group of users.
How do you set up an account to do either of these? It all depends on the security items which you set up with this screen. When you install WIZARD into an account, the first of the above techniques will be in operation. To find out precisely how this is achieved, read the details on the first field of this screen below.
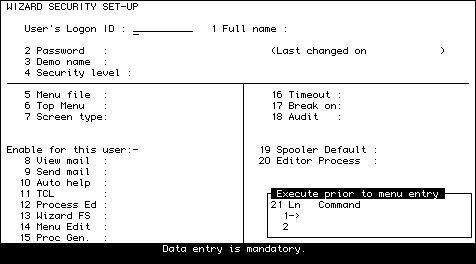
The screen for maintaining user security looks like this:

The following is a description of the fields on this screen:
If there is a Logon ID which matches the current account name, and that Logon ID has no password, then when you log to the account you will be taken directly to the menu specified by this item. This is how the account is setup when you first install WIZARD into it. This will happen no matter how many other Logon IDs you set up in the account. If you want them to be enabled, you must delete the item with this field equal to the account name.
If this field is null, then the user will not have to enter a password - the Login ID will take them directly into the menus.
Security levels throughout the system range from 0 (the lowest) to 9 (the highest). A security level of 9 does not exclude the user from any routine (unless a password is attached). 9 does not, however, give this user unlimited access, since such options as TCL access are determined by the settings below (see fields 11 and onward below).
0 is the default security level.
| Screen Type | |
| 0 | 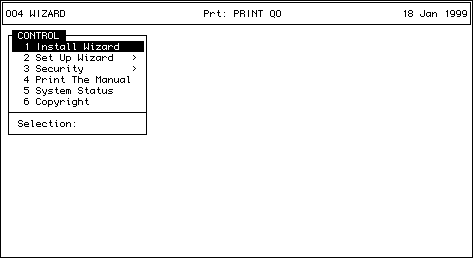 |
| 1 | 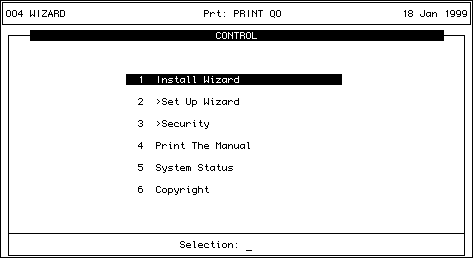 |
| 2 | 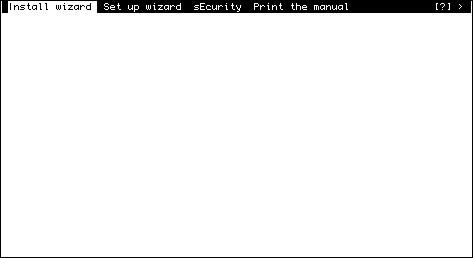 |
The next series of fields contain either a Y for yes (i.e. enable the function) or an N for no (disable the function). These fields further control what this user can access.
If, for example, you enter 600 here, and the menu is left sitting for more than 10 minutes (600 seconds), when next someone attempts to use the menu, they will be logged out of the system with a message telling them that the timeout has expired.
A timeout of 0 (zero) will mean that there is no timeout.
For security to be complete on your system, if you do enable users' break keys, you ought to ensure that the account has the restart option activated (if your operating system includes this - for R83 Pick this is an R in attribute 9 of the account's SYSTEM file entry). If this is not done, users could break and then END and get to TCL and thus violate WIZARD's security.
Y here will enable auditing of this user. N or null will disable it.
Note that auditing can slow down response time for a user. If you wish to use the auditing function but you find that it slows things down too much (especially after it has been in operation for some time) you should clear out the WAUDIT file. If you wish to retain the information from the WAUDIT file you should either save it to some backup device regularly or else store it in a history file.
The last couple of fields are related only to the initial log in of the user. These are:
The codes you enter here should be those you would normally enter after the SP-ASSIGN command from TCL to achieve the appropriate spooler settings.
ProcessName FileName ItemName
For example, if you enter ED here, WIZARD lets you use the standard system editor.
To use the WIZARD screen editor, leave this field blank, or enter W.
If you decide to use your own editor you will not be able to take advantage of the many features in the WIZARD Editor. It is wise to refer to the manual on the WIZARD Editor before you decide to use your own editor.
Finally, having entered the data for the user you are creating (or changing data for an existing user), you file the item and the changes will be made effective the next time that user logs onto the system.
The Edit Menus option on the menu allows you to create, edit, or delete menus from the system. Note that this screen is also run when you move the selection bar over a menu and then type ED and hit
A few points to remember when designing menus are:
The menu you create here is stored in the file you are assigned in the login security item. The default file is simply called MENU. The screen which lets you maintain menus looks like this:
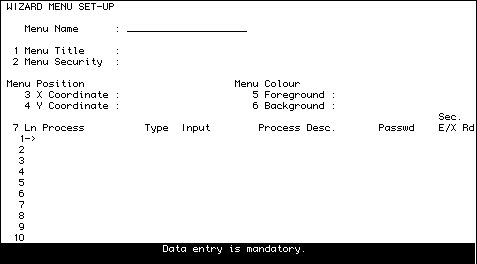
The fields are described here in the same sequence as on the screen.
The security default is 0.
The remainder of this screen is a Line Item Set Each line of the Line Item Set represents one line of the menu you are creating. You need to go through these steps for each line of the menu you are creating. The fields are:
[File Name] [Item Name]
If the process's file name is the account's MD, you need only enter the item name.
If the process is a menu you should enter only the name of the menu, the file name comes from the login ID. It will generally be the file named MENU.
| B | A BASIC program which is not run through a catalogue pointer in the MD or VOC. The process name for type B must include the filename. |
| C | A Program which has been catalogued. Alternatively, you could run a proc in the MD or VOC by calling it a C type. |
| M | This item is a menu. |
| P | A Proc. This requires that the Process field includes a filename. A Proc is an interpreted item beginning with the letters PQ on the first line. |
| R | A Proc Report. These are set up from a WIZARD screen in the report section of the WIZARD Generator menus. |
| S | A WIZARD S type subroutine (passed only one parameter into the COMMAND variable). The menus pass whatever is in the Input field. If no value is in the Input field, the process name is passed. If the word NULL is in the input field, a null parameter is passed. |
| T | This line is text only and cannot be selected as an option. It can be used simply as a heading within the menu. |
| V | A verb. This type may be followed by the letter C which will clear the screen before executing the verb, or the letter P which will Pause before refreshing the screen and returning to the menu, or it may be followed by both letters. |
| W | A WIZARD screen. The process name should not include the prefix "W." before the name of the screen. WIZARD reports (not Proc Reports) should be entered as type P and the file name for them is MD or VOC. |
| X | This will cause the menus to CHAIN to the process (i.e. it will not of its own accord return to the menus). This is required on some systems if you wish to LOGTO a different account from a menu option.
It is recommended, if you do log out of the account from the menu, that your logout process delete the entry in the WIZ.LID file whose ID is the user's port number. Failure to do this may compromise the account's security. |
There are two columns here, one for Edit security (labelled E) and one for Execute security (labelled X). These are identical except in the case of catalogued programs or WIZARD screens (types C or W). Edit security defines the security level a user requires to edit the source of the process, whilst execute security defines the security level a user requires to run the process.
Note that if you have added a menu as a process from this menu and you change its security, the Menu Security level of that menu (field number 2 on this screen) will be updated automatically.
Once you have entered all these parameters, you may file the item and it is ready to run (once it has been made accessible to users, for which see the Login Setup).