ContentsIntroduction Mail Notification The Mail System Function Keys |
WIZARD includes a mail (or message) system. This allows you to send messages to others on the system (or even send reminders to yourself).
Although many people today use mail systems provided with Windows, Wizard Mail is included for backward compatibility and for those users with ASCII terminals.
When you have been sent mail, a flag appears in the menu's status box, simply saying MAIL. To view that mail, all you need to do is type MAIL from either the menus or from TCL, and you will enter the mail system (described below).
If you have been sent mail since you last logged on, or you have not yet viewed mail sent to you in the past, then when you logon WIZARD will take you directly into the mail system before you get to the menus.
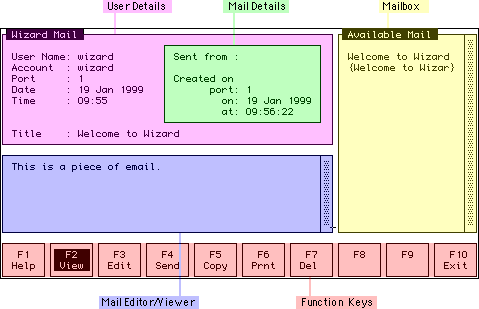
The mail system divides your screen into a number of panes, all of which are illustrated in the diagram below.

These panes are described below.
The User Details pane displays details about who you are and the current system date and time. It also includes the Title of the current piece of mail (which can also be seen in the Available Mail pane.
The Mail Details contains information about the sender of the mail.
This pane is also used when you send a new piece of mail to enter the details about the recipient(s) of the mail.
The Mailbox contains a sorted list of all pieces of mail you have either received or created and not sent. Unread mail is listed first. Mail you have either read or edited before sending is listed after the unread mail, and the title is enclosed in parentheses (so, for example,
The Mail Editor/Viewer pane displays the contents of pieces of mail you have received, and is used to edit or write pieces of mail. Mail editing/writing is done using the Wizard Word Processing routine.
The mail package makes extensive use of function keys, and for convenience, these are displayed across the bottom of the screen. Note that you can access the functions by pressing the first alphabetic character of the function (for example, to edit a new piece of mail, you can type either
The operation of the function keys is described below:
Having selected to view mail, you can select the item in the mail box by moving the highlight bar with the arrow keys to the appropriate items, and then press
When you have selected the item, it will be displayed in a box at the bottom of your screen. This is a standard help display box and you can scroll around using the arrow keys
Once mail has been viewed, if it was a new mail item, it will be moved in the list to the old mail section.
When you choose to edit a piece of mail, one of two things can happen:
If you do select an existing item, the first thing you can edit is the title. Thus, the cursor will appear in the title field, and you can edit using the cursor keys. Press
If you have old items but want to edit a new one, press Exit when the highlight bar appears. Now you can enter a title for the new piece of mail you are creating.
Having selected and edited the title, the WIZARD Word Processor window will appear at the bottom of the screen. If you are editing an existing piece of mail, you will see that item's text appears. Otherwise it will be empty. You may enter or change whatever you wish to.
When you have finished and filed the item you have worked on, it will appear in the old mail section of the mail list. If you want to, you may now send it to another user.
When you indicate that you want to send some mail, the highlight bar will appear in the mail box, and you can move the cursor to the piece of mail you want to send. Once there, press
Note that only accounts into which WIZARD has been installed are valid as a mail destination, since only those accounts can access the mail.
When you have selected the piece of mail you want to send, the following information can be supplied about the destination of the mail.
These previous fields determine the destination for the piece of mail, while the remaining two fields determine when the person or people will receive their mail. These fields are:
You may move back to previous fields by using the Up Arrow key if you want to change them. To delete a setting you should enter a space. To move back down the settings, you can use the Down Arrow key.
Note that mail which has been sent will disappear from the old mail list. If you want to keep a copy, you should use the Copy function (see below).
When you select this option, the highlight bar will appear and you can move it to any piece of old mail. When you press
When you select this function, the highlight bar appears and you can move it to select the piece of (old) mail you want to print out. Pressing
If you have sent a piece of mail to all users, only you can delete it, even though it remains in the new mail section of the mail box.