ContentsAbout this Chapter Account Headings Setting a Port's Function Keys The Menu Access List |
After you have Installed Wizard into an Account you may select the Account Setup option from the Menu. This option allows you to set the Account Headings, Set Function Keys and to re-build the users Menu Access List.
This screen allows you to set the headings for your account. When you enter it, it appears as follows:

There are two types of headings here, these are:
If this is not set, Wizard will try to use the account name to create the login banner.
Although Wizard can recognise the function keys from the code set up in the Keyboard screen, you need to define what you want the keys to represent. There are only two function keys which you cannot define, these are
If you do set up your function keys to perform certain commands, these commands will be valid from the menus, from Wizard's TCL interface, and from within Wizard screens (although Wizard screens may have their own function key settings which will override your settings while you are running those screens).
Wizard routines such as the Wizard Screen Editor, or the Wizard Word Processor, however, have their own function key settings.
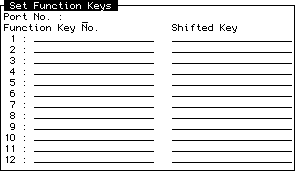
When you enter this option, you enter a Wizard screen which appears as follows:

The port number field will display the port number you are using as default. You may type the number of another port or press
Following this you enter a Line Item Set which allows you to enter the function performed by each function key. For example, if you want function key 2 to be loaded with TCL (i.e. pressing
It is possible to make a function key perform the operation of another special key (such as backspace), by typing one of the following to perform the required function:
| HELP | Call up the help. |
| UP | Move the cursor up. |
| DOWN | Move the cursor down. |
| LEFT | Move the cursor left. |
| RIGHT | Move the cursor right. |
| WORD_LEFT | Move the cursor left a word. |
| WORD_RIGHT | Move the cursor right a word. |
| MAR_REL | Margin release - allows you to enter data past the end of the displayed field. |
| BSPACE | Backspace and delete the previous character. |
| DELETE | Delete the character the cursor is over. |
| INSERT | Enter edit mode (not currently used). |
| PAGE_UP | Move to the previous page. |
| PAGE_DOWN | Move to the next page. |
| TOP | Move to the top of the document. |
| BOTTOM | Move to the bottom of the document. |
| START_LINE | Move to the start of the line. |
| END_LINE | Move to the end of the line. |
| DEL_WORD | Delete the current word. |
| DEL_LINE | Delete the current line. |
| EXIT | Exit (as with |
This option - Build the Menu Access List - is really only a setup option. After you have created your login IDs, and your menus, you should run this option.
This will run an routine which displays a box (just to show you that it is indeed running). Unless you run this option, you will not be able to use the Jump lists, or the LIST command from the menus.
The option also needs to be run after you have changed someone's menu or added new programs to the menus.