In this chapter we will discuss:
A Data-Type specifies the kind of data that will be stored in a field within a Wizard Screen or printed from a Wizard Report Every Field Definition has a Data-Type associated with it. The three most common Data-Types are:
| N | for data which is numeric. |
| A | for data which is alphabetic. |
| X | for data which contains any characters. |
Many Data-Types are available. Some of these Data-Types deal with money, dates, post codes, phone numbers, social security numbers, etc. You can even create your own Data-Types.
One function of Data-Types is to specify that the data entered is to be checked (or validated) for correctness. For example, let us say that one field of a data entry screen was to be used to enter Social Security Numbers.
All Social Security Numbers in the USA have the form of 333-222-4444. If you want to ensure that the data for Social Security Numbers is entered in exactly that format, then you can use the SSN Data-Type.
To do this, when Wizard asks you to enter the Data-Type you would respond by typing SSN.
When data is entered into this field by the data entry operator, the data will be validated to be sure that it contains 3 numbers and a dash, followed by 3 numbers and a dash, followed by four numbers. If the data is not entered in exactly that way, an error message will be displayed to the data entry operator.
You may find it convenient to set up a custom Data-Type for fields which may be used on various screens, or reports which are specialised to your firm or industry. Perhaps you need a special part-number format. Within the Program Maint menu, you can select Edit Data-Types to create Data-Types to your specifications.
Examine the parameters of some of the existing Data Types to figure out how they are used.
You may create your own Data-Types for common fields within a system.
For example let us say you have an Inventory system and the Products allow for an Alternate Product Id to be entered. You could create a Data-Type called PRODUCT.ID which contains all the Code Segment code to check if the Id entered is a real Product or an Alternate Product, If Alternate, then find the real Product Id.
Once this has been created all you need do when painting a Wizard Screen that requires the Product Id is to enter PRODUCT.ID for the Data-Type.
Note
If you change any existing data type, that change will have no effect on existing screens already using that data type. To make any change you would have to, after changing the data type, go into the screen formatter and use the C commands on the appropriate field, re-enter the data type, and then re-generate the screen.
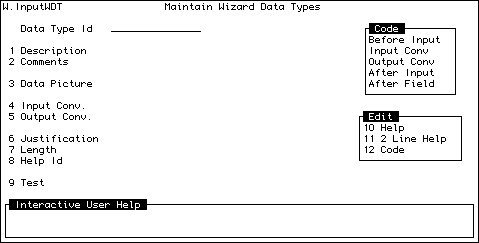
Wizard allows you to create and maintain your own datatypes, these are stored in the WDATATYPES file. The following routine allows you to maintain all Screen based datatypes, and it looks like this:

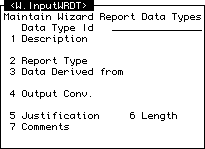
Wizard Report datatypes are also stored in the WDATATYPES file. This type must have as the first character the @ at sign, and they may be maintained using a Pop-Up window which looks like this:
Use this option to list some valid data types. Some of the more important pre-defined data types include:
| STATE | The STATE Data-Type specifies that the data entry operator will only be able to enter a two-character state code that matches a code in the STATES file. If the entry is valid, the full state name is displayed on the screen replacing the state code. If not valid, an error message is displayed. | ||||||||||||||||||||||||||||||||||||
| ST | This operates in the same manner as STATE, except that only the code is displayed on the screen instead of the full state name. | ||||||||||||||||||||||||||||||||||||
| STA | This operates in the same manner as STATE, except that the full state name is displayed to the right of the code. | ||||||||||||||||||||||||||||||||||||
| PHONE | The PHONE Data-Type specifies that the data entered will be of the form: 222-3333, 111-222-3333, or 1-222-3333. | ||||||||||||||||||||||||||||||||||||
| DATE | The DATE Data-Type allows the data entry operator to enter any commonly used form of a date. For example, 5-2-99 or 5/2/99. If the year is omitted, the current year is used. Also, if a D is entered, then today's date is assumed. The date is redisplayed on the screen in the style of DD-MM-YY. Many other Data-Types for Date are accessible. Some of the more common ones are:
(Where / is shown, * or - may be used instead.) | ||||||||||||||||||||||||||||||||||||
| MONEY (or M) | The Money Data-Type indicates to Wizard that the data entry will be numeric, and that the output on the screen will have 2 decimal places, and be left justified. When you specify the MONEY or M Data-Type, Wizard will ask you for the length of the field. You must remember that 3 characters of the length will be taken up by a decimal point and 2 decimal places. This specification checks only that a number has been entered as data, and then formats that number. It does not validate for the range of the entry. Many other money Data-Types are available for your use. The following Data-Types for money will:
Beginning a money Data-Type with MR specifies that the data will be right justified. ML specifies left justification. The patterns and ranges of each money data type are as follows:
(Where .2 is shown, .1 or .3 may be used instead, replacing the R with L will give the same pattern and range check, but Left justified.) | ||||||||||||||||||||||||||||||||||||
| YN | The YN Data-Type is used for data entry questions which must be answered with either a Y or N. If the data entered is not a Y or an N, an error message will be displayed on the data entry screen. | ||||||||||||||||||||||||||||||||||||
To list all the available data types, get to the Screen Generator menu (type W at any menu) and enter the Program Maint menu. From here you can select List Data Types to get this list. (The file listed here which contains all the data types is called WDATATYPES.)
Wizard Codes are used whenever you are using the Wizard Editor They are not available if you use any other editor such as the system editor ED. See the discussion on the Wizard Editor in chapter 1 of this manual.
When in the Wizard Editor you may hit the function key 3 (
The Pop-up looks like this :

Wizard Codes are maintained from the Advanced Tools menu which is from the File Maintenance menu from the Wizard Menu (W), and it looks like this :
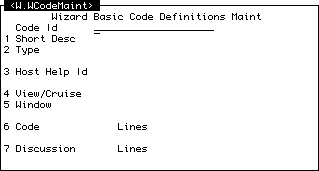
As there are many hundreds of Wizard Codes and some Commands have the same Id in ACCESS and Basic, Wizard stores the Codes by Type. When you request a Lookup of the Codes you will first be presented with a list of Code Types. After you select the Type Wizard will display all the Codes for the given Type.
You may maintain you own Code Types using the following Pop-up window which looks like this:

Wizard allows the Screen designer to display pop-up Error Messages. The Error Message will be displayed in the centre of the Screen and depending on the Type will request input from the operator. The operators input is returned to the calling process.
If the Type of Error Message includes either Cancel or Abort, the Wizard Screen will automatically set the EXITFLAG which will terminate and Exit the current Screen.
To use the Error Message routine you need to create an Error Message item and then to use it in a Wizard Screen simply do:
   Msg=10011
   GOSUB 3010
   IF WMSG.ANS = "{Valid Resp.}" THEN
      ...
   END
Use the Wizard Error Message Maintenance routine to document and log Error Messages, the Screen looks like:

Perhaps the first problem any systems designer faces is how they are to set up their new application. Most multi-value database systems give you several options.
You can create different accounts for different component applications, or you can create one account for all the applications. Each method has its own advantages and disadvantages.
Should you wish to keep every component of your application within the one PICK account, Wizard can help keep the various components separate. Users can be directed into the appropriate area by the Menu and Security system.
Wizard also helps at the design level. The Applications Maintenance screen (is accessed from the Documentation W menu allows you to associate files and processes with a defined application.
Selecting this option displays the following screen:
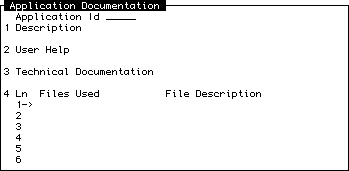
This allows you to define various applications.
Applications are defined by a code which you select and enter into the first field on this screen.
For each application, you can enter documentation (use /W in either help field to enter help using the Wizard Word Processor).
At the bottom of this screen you can enter a list of files which are aligned to this application. The file names must already exist in the WIZ.FILES file, which means that you must have entered details for them using the File Security screen.
Wizard allows you to create your own automatic demonstrations.
There are two variations on demonstrations: Auto demos and Tutorials. Auto demos run through a sequence of events without user intervention, while tutorials run through a set of events interactively - waiting for a user response.
If the name you choose for "Demo Name" begins with "T." it will be treated as a tutorial, otherwise it will be treated as an Auto Demo.
CATALOG WDEMO.BP *
While UniVerse requires:
   SELECT WDEMO.BP
   W4.CATALOG WDEMO.BP LOCAL
If the account has more than one DEMO operator, you will be presented with a list of valid demo operators. Select the appropriate one. If you have set up only one demo operator, you will go straight into learn mode.
When the cursor is at the position of the top left corner, press the
In view of this, move the cursor as far down the screen as possible. When you have done this, press
If you selected the FAST.LEARN login, you are now ready to continue with the next command. If you simply used the LEARN login, Wizard now prompts you for the text you want displayed at this point of the demo.
When entering text, note that pressing
| Q | will terminate recording of the demo and will create a demo which will, when replayed, loop repeatedly until terminated by the operator. |
| X | will terminate recording and will create a demo which will play through only once. |
W.WDemoMaint<Return> <Return>
You will then have to enter the name of the DEMO you wish to update. This process displays a screen which appears as:
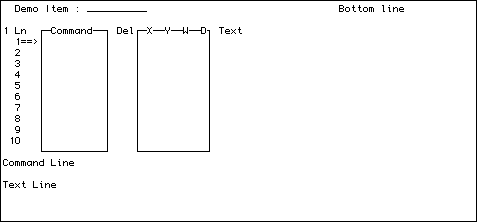
Once you have completed recording the demo, you can play it back using the AUTO command at Wizard login, or else just type the name of the DEMO login ID.
There are some points to watch with the automatic demonstrations. You should be aware of the following:
The fix for this problem is to ensure that any of your own programs which require input call Wizard's input routines. For details on how this can be achieved, refer to the section on using Wizard in your own BASIC programs elsewhere in this manual.
If you want to run a Wizard tutorial, log on to a Wizard Demonstration account and, at the Operator Code prompt, type in the word TUTE followed by a
Wizard will then display a list of tutorials. Select one using the up or down arrow keys.
If only one Wizard Tutorial is present, that tutorial will begin immediately.
In a Wizard tutorial, you will be led through a series of events. Each time, you will be asked to type something or press a certain key. If you do not type the correct keys, Wizard will warn you by issuing a BELL sound from your terminal.
If you do not feel like typing each command as you are prompted, you can either hit the
To quit a tutorial simply type the letter Q (and, depending upon where you are, a