Documenting your system can be one of the most laborious and time-consuming parts of creating a software product. Programmers would rather spend their time creatively producing software, and so in many cases, production of documentation lags far behind software production.
Wizard does its best to help you out when it comes to documentation. Of course, if you want a comprehensive manual for your system, Wizard cannot do everything. There are a couple of points to keep in mind when developing a system which will make documentation somewhat easier:
Wizards help facility allows every object created in Wizard, or even accessed by Wizard, to be documented. Wizard's on-line documentation consists of:
To enter menu-level documentation, you access the Wizard Word Processor by typing either <F5> (function key 5) or the U key from within the help display box. You will need to have a security level of 8 or higher to edit the help.
The two line help is entered in the screen formatter's E Command.
Field help can be entered from the screen formatter by typing the EH Command from the command prompt and selecting a field, or from the screen when it is running by displaying the help and then typing
The documentation menu on your Screen Generator menu contains several different documentation options which allow you to fully describe individual Screens as well as Printing user Manuals.
Some of the options allow you to select where you want to send the output. You may send it either to the terminal or the printer. If you send it to the printer, it will go to the currently defined printer queue. To change the printer queue you should get to TCL and use the SP-ASSIGN command (refer to your system manual).
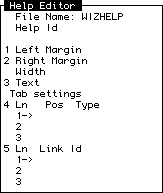
Wizard creates Help items with a specific structure and allows you to nominate a Help file, the default is WIZHELP.
This screen allows you to enter and maintain individual Wizard help items and it looks like this:
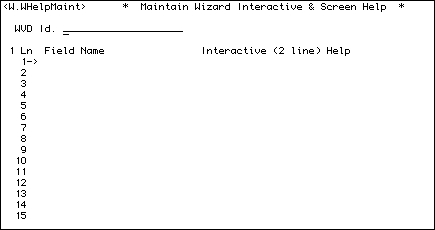
Documentation for a Screen is often left to last, this routine allows either the programmer or user to maintain both the 2 Line interactive help and the full Field Help (
The Screen looks like this :
This option prints the basic user documentation for a screen. This incorporates all the help generated by Wizard or entered by you with a picture of the screen. You can use this as part of a system manual you create for the system you create using Wizard.
When you are generating a screen and need to work on it, you may wish to use this option to print information about the screen - the code segments, the features you have selected, etc. This may help you debug your program.
Create a user manual allows you to instantly document your own system. This process begins from a specified menu and proceeds to print help for each option from that menu. If an option is another menu, then this process will traverse that menu as part of the manual production.
Your final manual will include representations of Wizard screens, pictures of the menus as they are traversed, and all the available system help.
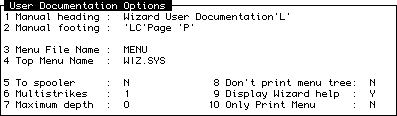
You are first presented with a Screen to enter the basic Manual details, the Screen looks like this:
This option allows you to print this documentation in form of the manual for Wizard.
Note that you need to assign the correct output if you want to send the manual to the printer.
When you select this option, you will be prompted by this routine, asking where you want to send the output. You have two choices:
| P | The manual is sent to the printer currently assigned as output for the spooler. When this option is selected, you will see messages telling you which spool file number the manual is being sent to. The manual is sent into a series of spool files as it is too large to fit into just one. Note that the manual being large, may not only take quite a large number of pages, but may tie up the printer for quite some time. |
| S | The manual is sent to the screen. This is a very slow and roundabout way of viewing the manual. A better way is to hit the function key 1 ( |
Wizard allows you some control over the formatting of the manual when you print it out. In the file WHELP are several RULER items.
To adjust formatting, you first need to know how wide the system setting for your output device is. You can usually find this out (or change it) with the TERM command, which you should run from TCL. Remember, if you are going to print to a printer you should look at the width under the Printer column.
Also remember that, if you are going to print to a printer, you must set the printer to accept the width you select. You usually do this by selecting the CPI (Characters Per Inch) value on your printer.
To adjust formatting, you need to edit the WHELP item whose ID is "RULER.xx" where "xx" is the width of the output device. For example, if you are printing to a 96 column printer, the formatting control item would be called "RULER.96".
Wizard includes four ruler items in the WHELP file: RULER.79, RULER.80, RULER.131, RULER.132. If you want a width other than one of these, you can copy one of these items and this makes it easier to set up.
Within the RULER items, attribute 4 contains the letters L, S, T, R. Where you place these on attribute 4 determines how the manual will print. The letters represent:
| L | The left margin. |
| R | The right margin. |
| S | The starting position of Sub-Headings. |
| T | The left margin for text. |
Although you may vary their positions, you should always have these in the order: L, S, T, R.